There’s nothing quite like the satisfying crunch of a perfectly cooked chicken katsu, especially when it’s drizzled in a rich, savory curry sauce. The moment you slice into it, the crispy exterior gives way to tender, juicy chicken, and you can’t help but feel a wave of comfort wash over you. After a hectic week, I found myself longing for something homemade and hearty, and that’s when the idea of Crispy Chicken Katsu Curry popped into my mind.
This dish is not just a feast for the senses—it’s a delightful marriage of flavors that’s surprisingly simple to whip up in your own kitchen. From the savory notes of garlic and ginger to the warm embrace of curry spices, each bite reminds you that homemade food is where the heart truly lies. If you’re tired of the same old fast food routine and ready to get back to cooking delicious meals that impress family and friends, this recipe is your answer. Let’s dive into how to create this irresistible dish that’ll become a favorite at your dinner table!
Why You'll Love This Crispy Chicken Katsu Curry
- This recipe is incredibly easy to make, allowing you to enjoy a homemade meal without spending hours in the kitchen.
- The explosion of flavors from the crispy chicken and rich curry sauce will have your taste buds dancing with joy.
- Its versatility means you can customize the curry spice levels or add your favorite vegetables to make it your own.
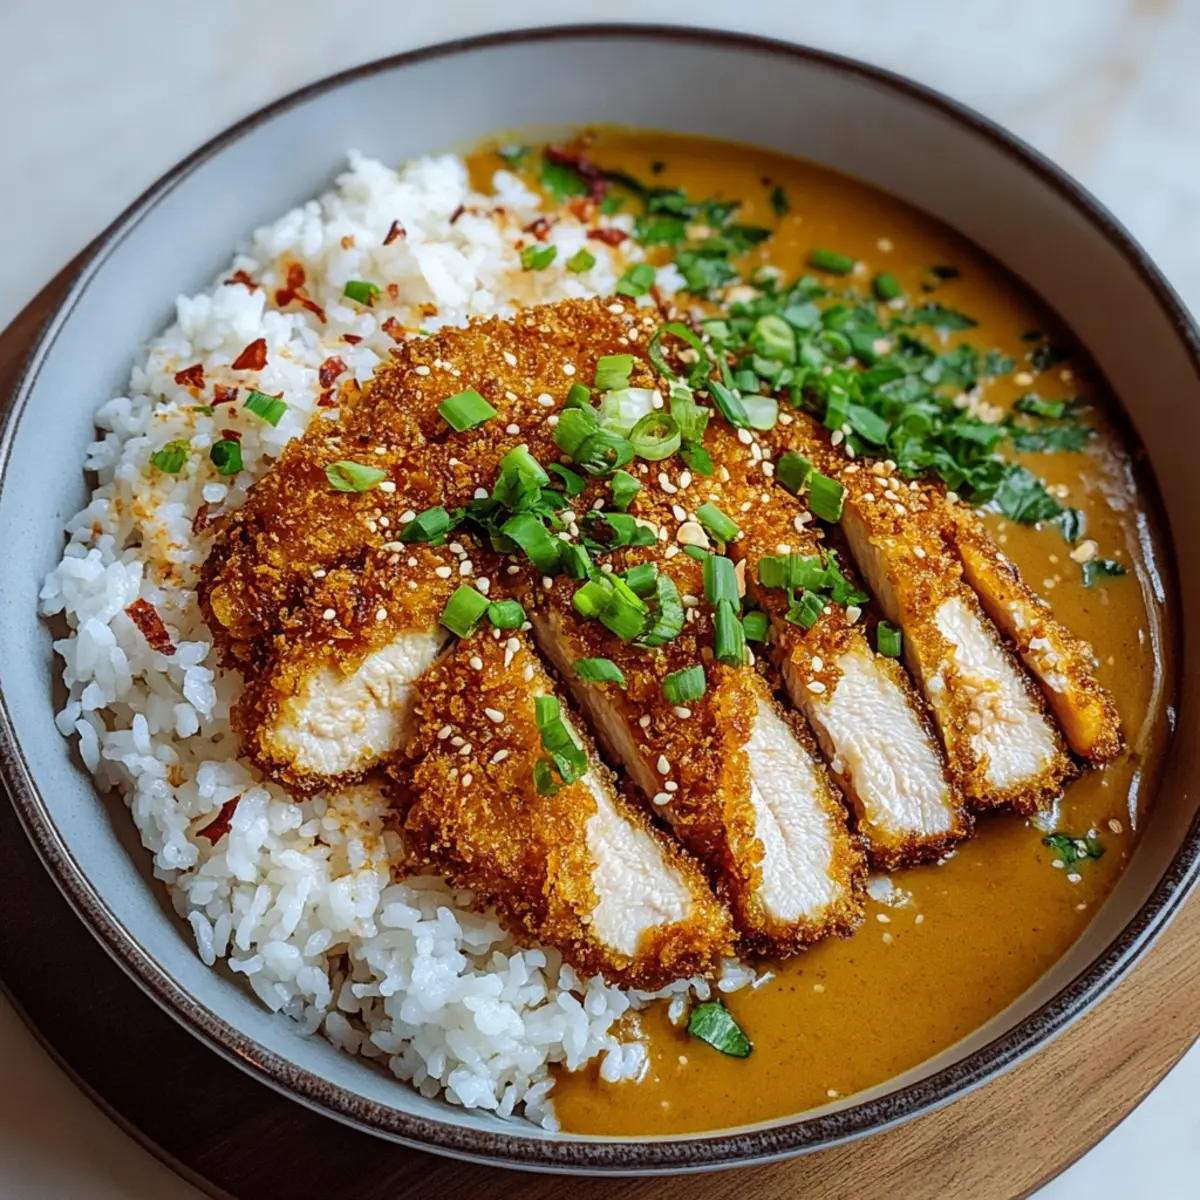
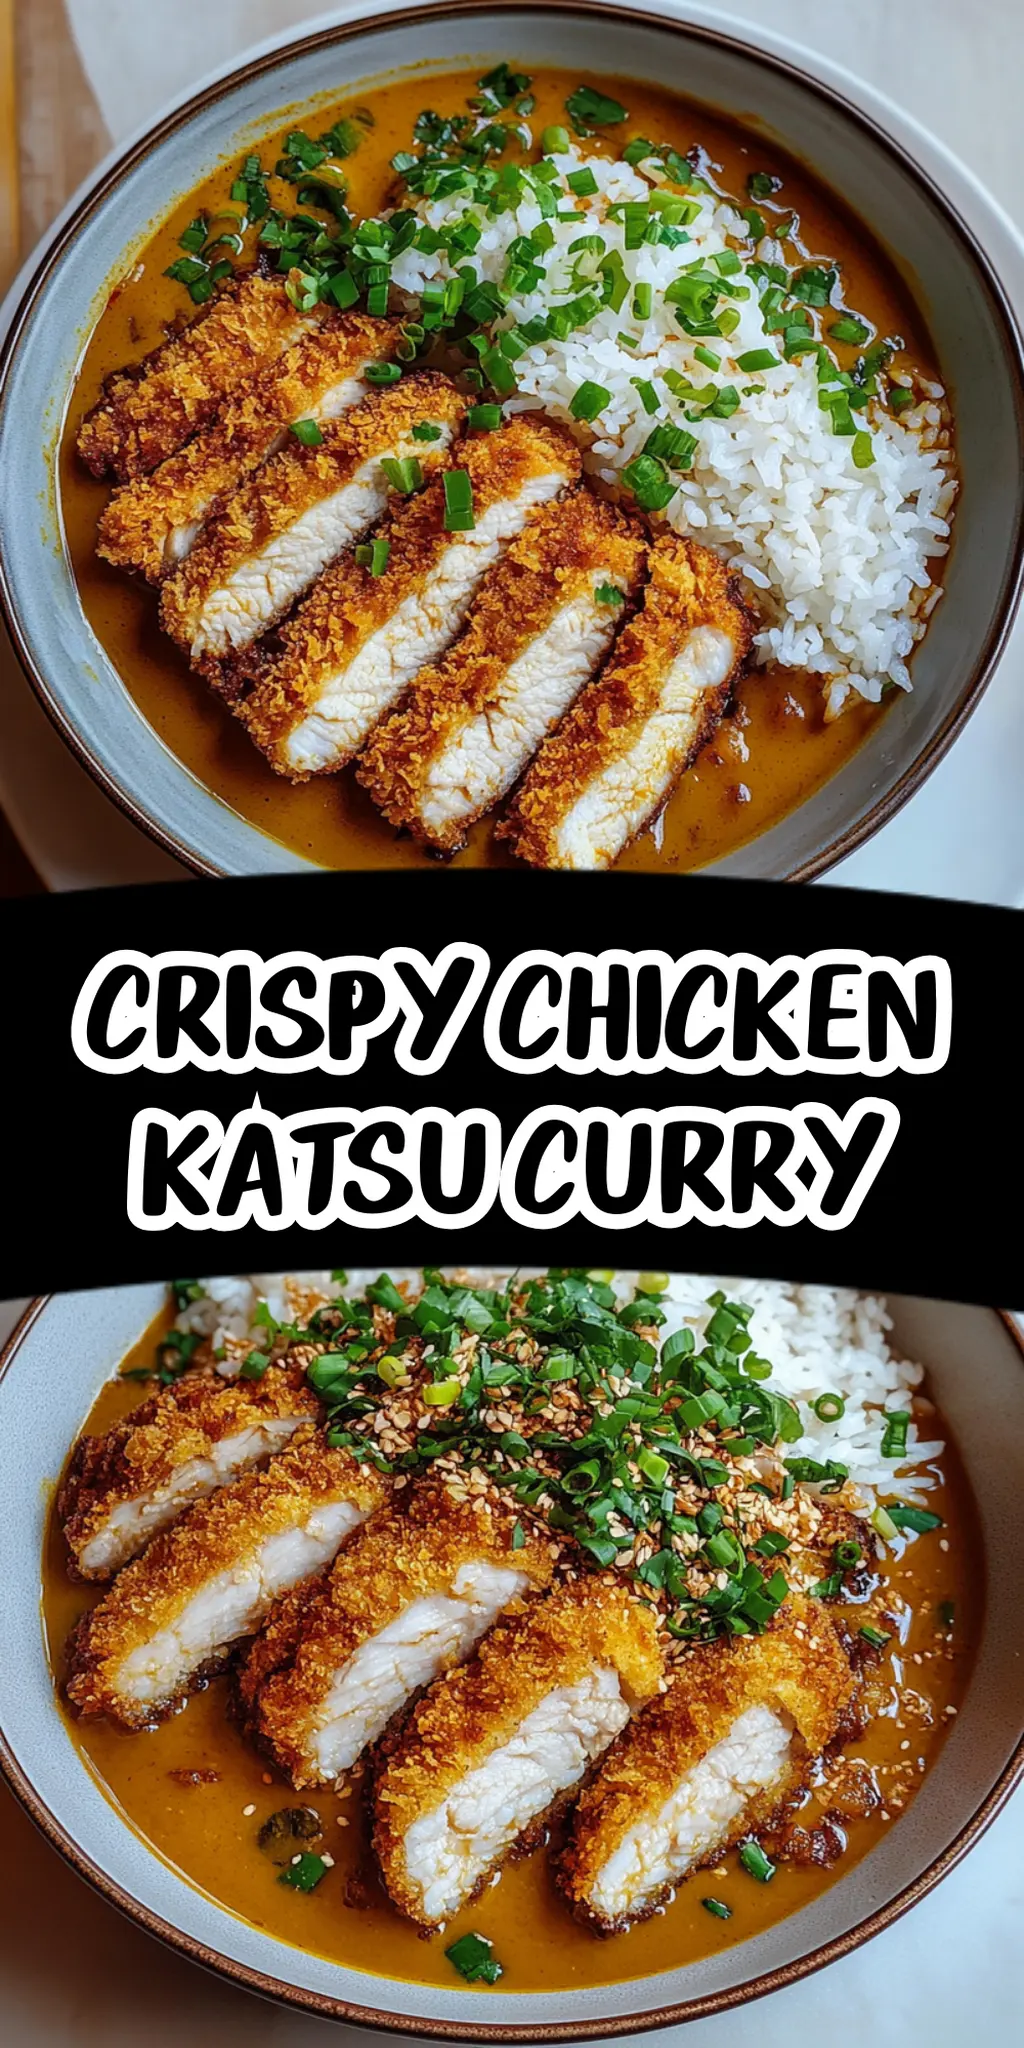
- Visually, the vibrant colors of the dish, served over rice and garnished with fresh green onions and sesame seeds, are sure to impress your guests and make mealtime special.
- Whether you’re feeding a crowd or enjoying a cozy dinner at home, this dish is a guaranteed hit that everyone will love.
Crispy Chicken Katsu Curry Ingredients
• Get ready to whip up this delightful dish with these simple ingredients!
For the Chicken
- Boneless, skinless chicken breasts – ensure they are pounded to an even thickness for even cooking.
- Salt and pepper – season to taste for a flavor boost.
- All-purpose flour – used for coating; it provides a good base for the egg and panko to stick.
- Large egg – beaten, it helps bind the coatings to the chicken.
- Panko breadcrumbs – for that irresistible crispy texture.
- Vegetable oil – used for frying; makes the chicken golden and crispy.
For the Curry Sauce
- Vegetable oil – a tablespoon added to sauté the aromatics.
- Onion – finely chopped, it adds sweetness and flavor to the curry.
- Garlic – minced for a fragrant kick that elevates the dish.
- Ginger – grated, it brings warmth and depth to the sauce.
- Carrots – sliced, they contribute a delightful crunch and sweetness.
- Chicken broth – use low-sodium for a balanced flavor.
- Curry powder – this key ingredient brings the “curry” to your crispy chicken katsu curry!
- Soy sauce – adds umami and a depth of flavor to the curry.
- Honey (optional) – a touch of sweetness that can balance the spice.
- Cornstarch – mixed with water, it thickens the sauce for that perfect consistency.
For Serving
- Cooked rice – a comforting base that complements the curry.
- Chopped green onions – for a fresh, vibrant garnish.
- Sesame seeds – add a bit of crunch and a nutty finish.
Gather these ingredients, and you’ll be well on your way to enjoying a scrumptious plate of crispy chicken katsu curry!
How to Make Crispy Chicken Katsu Curry
-
Pound the Chicken:
Start by placing the chicken breasts between two sheets of plastic wrap. Gently pound them to an even thickness of about 1/2 inch; this ensures uniform cooking. -
Season the Chicken:
Sprinkle salt and pepper evenly on both sides of the chicken breasts. Seasoning is key to enhancing the flavor of your crispy chicken katsu curry! -
Prepare the Breading Station:
Set up three shallow dishes: one for flour, one for the beaten egg, and one for panko breadcrumbs. Dredge each chicken breast in flour, dip into the egg, then coat with panko, pressing gently. -
Fry the Chicken:
Heat vegetable oil in a large skillet over medium-high heat. Once hot, add the breaded chicken and fry for about 4–5 minutes per side, until golden brown and cooked through. Drain on paper towels. -
Sauté Aromatics:
In the same skillet, add a tablespoon of vegetable oil. Add the chopped onion and sauté for about 5 minutes until translucent. Follow with minced garlic and grated ginger, cooking for an additional 30 seconds. -
Cook the Carrots:
Stir in sliced carrots and cook for about 3–4 minutes until they soften slightly, enhancing the flavor profile of your sauce. -
Simmer the Curry Sauce:
Pour in chicken broth, curry powder, soy sauce, and honey (if using). Bring the mixture to a simmer and let it cook for approximately 10 minutes for the flavors to meld. -
Thicken the Sauce:
If you prefer a thicker sauce, stir in the cornstarch mixture and let it cook for an additional 2–3 minutes, or until the sauce has thickened nicely. Adjust seasoning with salt and pepper. -
Slice the Chicken:
Carefully slice the crispy chicken katsu into strips, ready to be plated beautifully atop the rice. -
Serve the Dish:
Serve freshly cooked rice topped with curry sauce and arrange sliced chicken on top. This presentation makes it irresistible! -
Garnish for Flavor:
Finish off by sprinkling with chopped green onions and sesame seeds to add texture and brightness!
Optional: For an extra kick, drizzle with a little sriracha sauce before serving.
Exact quantities are listed in the recipe card below.
Crispy Chicken Katsu Curry Variations
Feel free to explore these exciting twists to make this recipe truly your own!
- Gluten-Free: Substitute all-purpose flour and panko with gluten-free alternatives like almond flour and crushed rice crackers for a crispy finish.
- Spicy Kick: Add chopped fresh chili or a dash of cayenne to the curry sauce for an extra layer of heat. This simple adjustment delivers a bold flavor boost!
- Vegetable Boost: Toss in additional veggies like bell peppers, snap peas, or zucchini for a colorful and nutritious addition to your curry. Each bite becomes a lovely surprise!
- Coconut Creamy: Swap half of the chicken broth with coconut milk for a rich and creamy sauce that pairs perfectly with the spices. It adds a delightful tropical twist to this hearty dish!
- Baked Option: Rather than frying, coat the chicken and bake at 400°F (200°C) for 20–25 minutes for a lighter, less oily version with still great crunch. A lovely alternative for those looking to cut back on oil!
- Honey Alternative: Replace honey with maple syrup or agave nectar for a vegan-friendly option that beautifully balances the curry’s flavors without sacrificing sweetness.
- Herb Infusion: Stir in fresh herbs like cilantro or basil into the sauce just before serving for an added burst of freshness that elevates the dish.
- Rice Alternatives: Serve over quinoa, cauliflower rice, or a bed of thinly sliced cabbage for a low-carb option that tastes just as delicious!
How to Store and Freeze Crispy Chicken Katsu Curry
Fridge: Store leftover crispy chicken katsu curry in an airtight container for up to 3 days. Keep the chicken and curry separate if possible to maintain the crunchiness.
Freezer: For longer storage, freeze the curry (without chicken) for up to 3 months. Allow it to cool completely before transferring to a freezer-safe container.
Reheating: To reheat, thaw the curry overnight in the fridge. Heat on the stove over medium heat, adding a splash of water to loosen the sauce. Reheat the chicken in a hot skillet for best results.
Serving Suggestions: When ready to enjoy, serve the reheated curry over freshly cooked rice and top with your favorite garnishes for that fresh feel!
Make Ahead Options
Preparing your Crispy Chicken Katsu Curry ahead of time is a fantastic way to save time on busy weeknights! You can fully bread the chicken and store it in the refrigerator for up to 24 hours before frying. Additionally, the curry sauce can be made ahead and kept in the fridge for up to 3 days. Just reheat the sauce gently on the stove, while you fry the chicken when ready to serve. To maintain that delightful crispiness of the chicken, fry it fresh just before enjoying your meal. This means you enjoy all the comforting flavors, while saving precious time—it’s a win-win for any home cook!
What to Serve with Crispy Chicken Katsu Curry?
Dive into a delightful spread that perfectly complements the warmth and crunch of your homemade dish!
- Steamed Broccoli: Crisp and vibrant, it adds a fresh balance to the rich, savory curry flavors.
- Coconut Rice: A subtle sweetness enhances the dish’s spice profile, creating a tropical twist that’s simply irresistible.
- Miso Soup: This umami-rich soup pairs beautifully, offering a lighter start before the heartiness of the katsu curry takes center stage.
- Pickled Vegetables: Tangy and crunchy, these provide a refreshing contrast that brightens each bite of your curry.
- Carrot and Cucumber Salad: A light salad dressed with sesame dressing brings a cool crunch to the meal, harmonizing textures and flavors.
- Japanese Sake: The smoothness and warmth of sake elevate the dining experience, making every sip a delightful complement to your meal.
- Mochi Ice Cream: For dessert, the chewy texture and sweet flavors of mochi ice cream create a delightful ending, leaving you satisfied.
Each of these suggestions embraces the comforting essence of your crispy chicken katsu curry and brings a culinary flair to the table!
Chef's Helpful Tips
- Make sure to pound the chicken breasts evenly to achieve a uniform cook and prevent dry spots in your crispy chicken katsu curry.
- A common mistake is not seasoning the flour, egg, or breadcrumbs, so remember to add a pinch of salt and pepper to each for extra flavor.
- When breading the chicken, press gently on the panko to ensure it adheres well to achieve that perfect crunchy texture.
- Fry the chicken at a medium-high temperature to ensure a golden brown crust without overcooking the inside, usually about 4–5 minutes per side works best.
Crispy Chicken Katsu Curry Recipe FAQs
How do I choose the right chicken breasts for the recipe?
Absolutely! Look for boneless, skinless chicken breasts that are firm and have a nice pink color. Avoid any that show signs of dark spots or are slimy, as these can indicate spoilage. Purchasing chicken from a reputable source can ensure freshness and flavor in your crispy chicken katsu curry.
What’s the best way to store leftover chicken katsu curry?
Very! To keep your leftovers fresh, place them in an airtight container and store in the fridge for up to 3 days. If you want to maintain the chicken’s crispy texture, consider storing the chicken and curry sauce separately. This will keep that delightful crunch intact when you’re ready to enjoy it again!
Can I freeze the curry sauce separately? How do I do this?
Absolutely, you can freeze the curry sauce! Allow it to cool completely, then pour it into a freezer-safe container or a heavy-duty freezer bag. Make sure to remove as much air as possible to prevent freezer burn. The curry sauce can be frozen for up to 3 months. When you’re ready to use it, simply thaw overnight in the fridge and reheat on the stove for a warm, comforting meal.
What if my panko doesn’t get crispy during frying?
If you notice your panko isn’t crispy, it could be due to cooking at too low a temperature. Make sure your oil is hot enough (around 350°F or 175°C) before adding the chicken. Frying in smaller batches also helps, as overcrowding the pan can lower the oil’s temperature, leading to soggy breadcrumbs. Avoiding this common error ensures your crispy chicken katsu curry turns out perfectly crunchy!
Is this recipe suitable for people with allergies?
It can be! However, this crispy chicken katsu curry contains common allergens like gluten (from flour and panko) and soy (from soy sauce). For gluten-free alternatives, use gluten-free flour and breadcrumbs. If someone has a soy allergy, you can swap the soy sauce for coconut aminos or omit it entirely. Always be sure to check ingredient labels, especially if serving to someone with food allergies.
How should I reheat my crispy chicken katsu to maintain its texture?
Great question! To reheat, I recommend using a skillet over medium-high heat rather than a microwave, as the microwave can make the coating soggy. Simply add a few drops of oil and reheat the chicken for 3 to 4 minutes per side, until warmed through and crispy again. Pair it with the freshly reheated curry sauce for an enjoyable meal!
Equipment
- skillet
- Meat Mallet
- Shallow dishes
Ingredients
For the Chicken
- 2 pieces boneless, skinless chicken breasts pounded to even thickness
- to taste salt
- to taste pepper
- 1 cup all-purpose flour for coating
- 1 large egg beaten
- 1 cup panko breadcrumbs for crispy texture
For the Curry Sauce
- 1 tablespoon vegetable oil for sautéing
- 1 medium onion finely chopped
- 2 cloves garlic minced
- 1 inch ginger grated
- 2 pieces carrots sliced
- 2 cups chicken broth low-sodium
- 2 tablespoons curry powder key ingredient
- 1 tablespoon soy sauce
- 1 tablespoon honey optional
- 2 tablespoons cornstarch mixed with water to thicken
For Serving
- 2 cups cooked rice for base
- 1/4 cup chopped green onions for garnish
- 2 tablespoons sesame seeds for garnish
Instructions
Instructions
- Pound the chicken breasts between two sheets of plastic wrap to an even thickness of about 1/2 inch.
- Season both sides of the chicken breasts with salt and pepper.
- Set up three shallow dishes for flour, beaten egg, and panko breadcrumbs. Dredge chicken in flour, dip in egg, then coat with panko.
- Heat vegetable oil in a skillet over medium-high heat. Fry the breaded chicken for 4–5 minutes per side until golden brown. Drain on paper towels.
- In the same skillet, add a tablespoon of vegetable oil. Sauté onion for about 5 minutes until translucent. Add garlic and ginger, cooking for an additional 30 seconds.
- Add sliced carrots and cook for 3–4 minutes until they soften.
- Pour in chicken broth, curry powder, soy sauce, and optional honey. Bring to a simmer and cook for 10 minutes.
- Stir in cornstarch mixture to thicken the sauce, cooking for an additional 2–3 minutes. Adjust seasoning with salt and pepper.
- Slice the crispy chicken katsu into strips.
- Serve rice topped with curry sauce and sliced chicken. Garnish with green onions and sesame seeds.