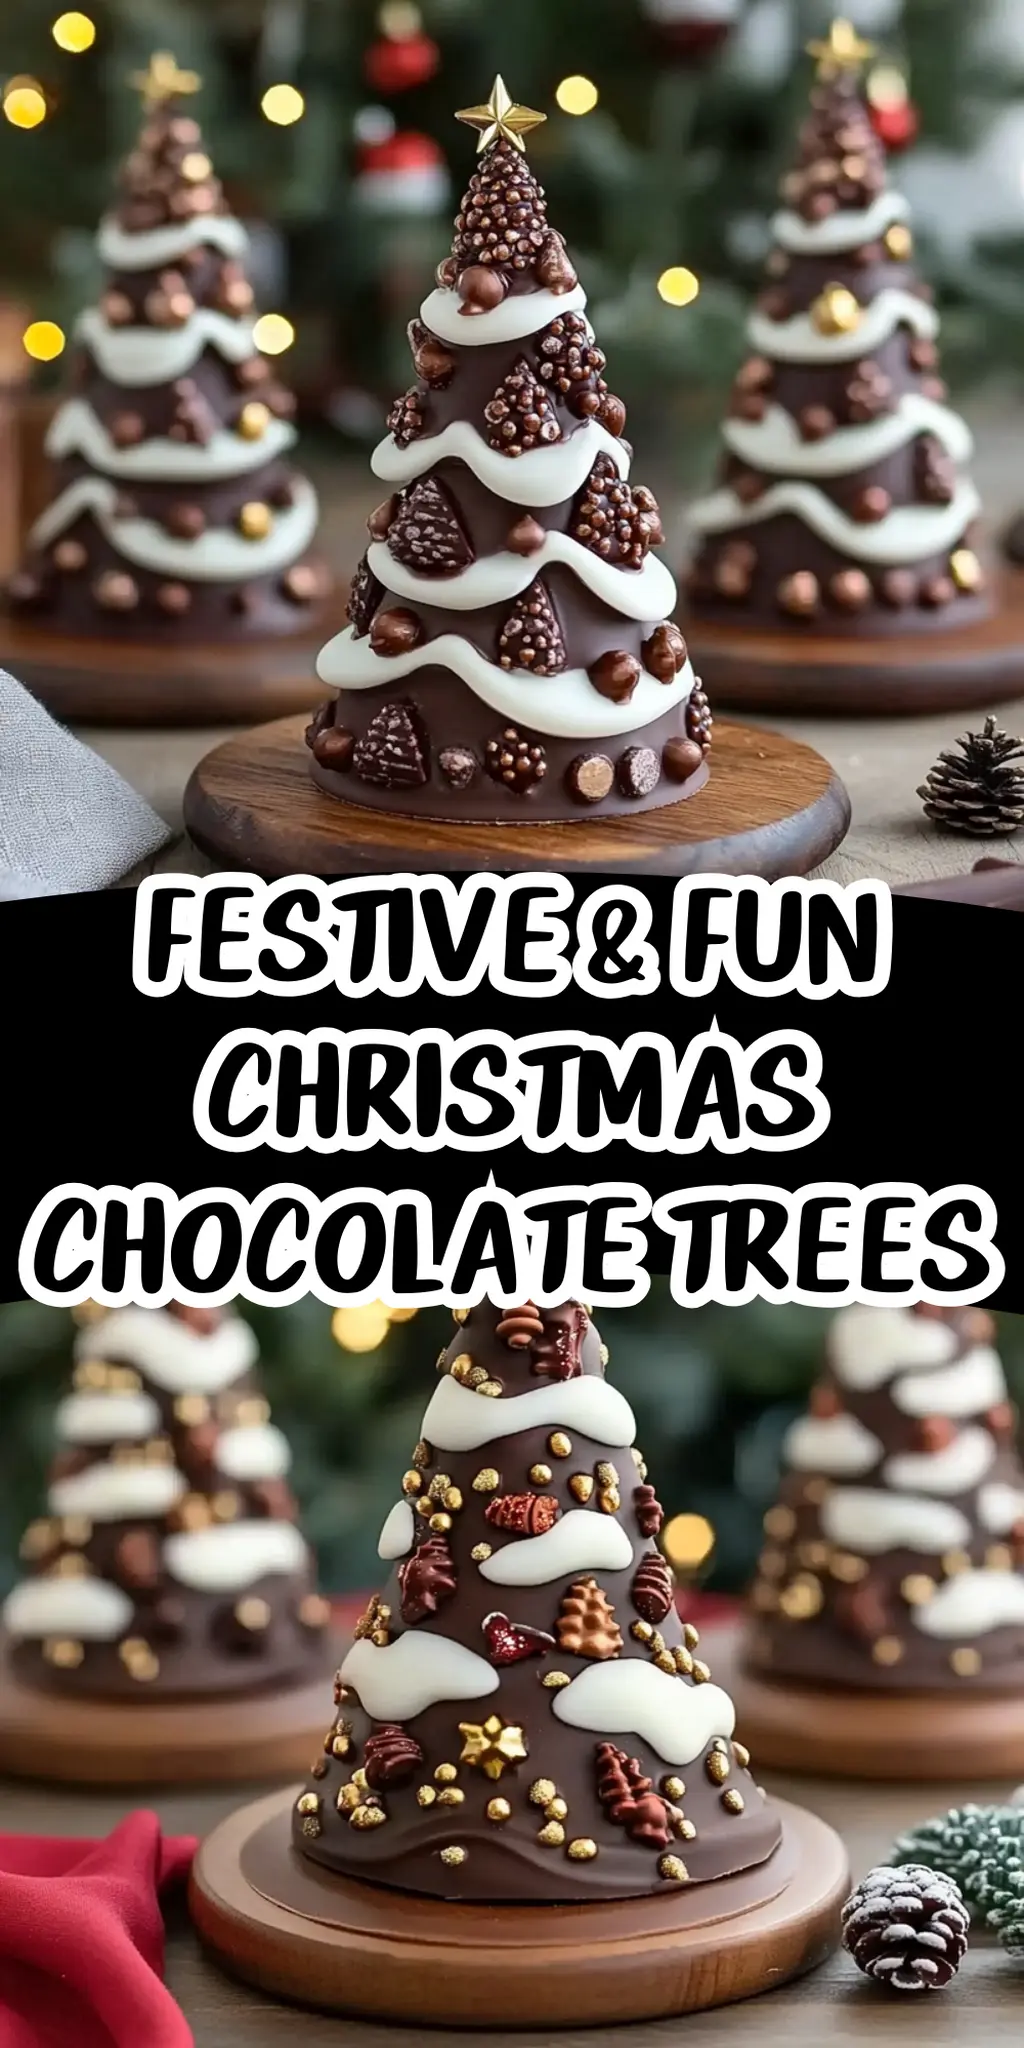
As the holidays approach, my kitchen transforms into a wonderland of treats and cheery aromas. The moment the first holiday carols play, I’m reminded that it’s time to whip up something special, something that brings smiles to faces young and old alike. This year, I stumbled upon a delightful idea that not only satisfies the sweet tooth but also adds a jolly touch to any gathering: Festive & Fun Christmas Chocolate Trees!
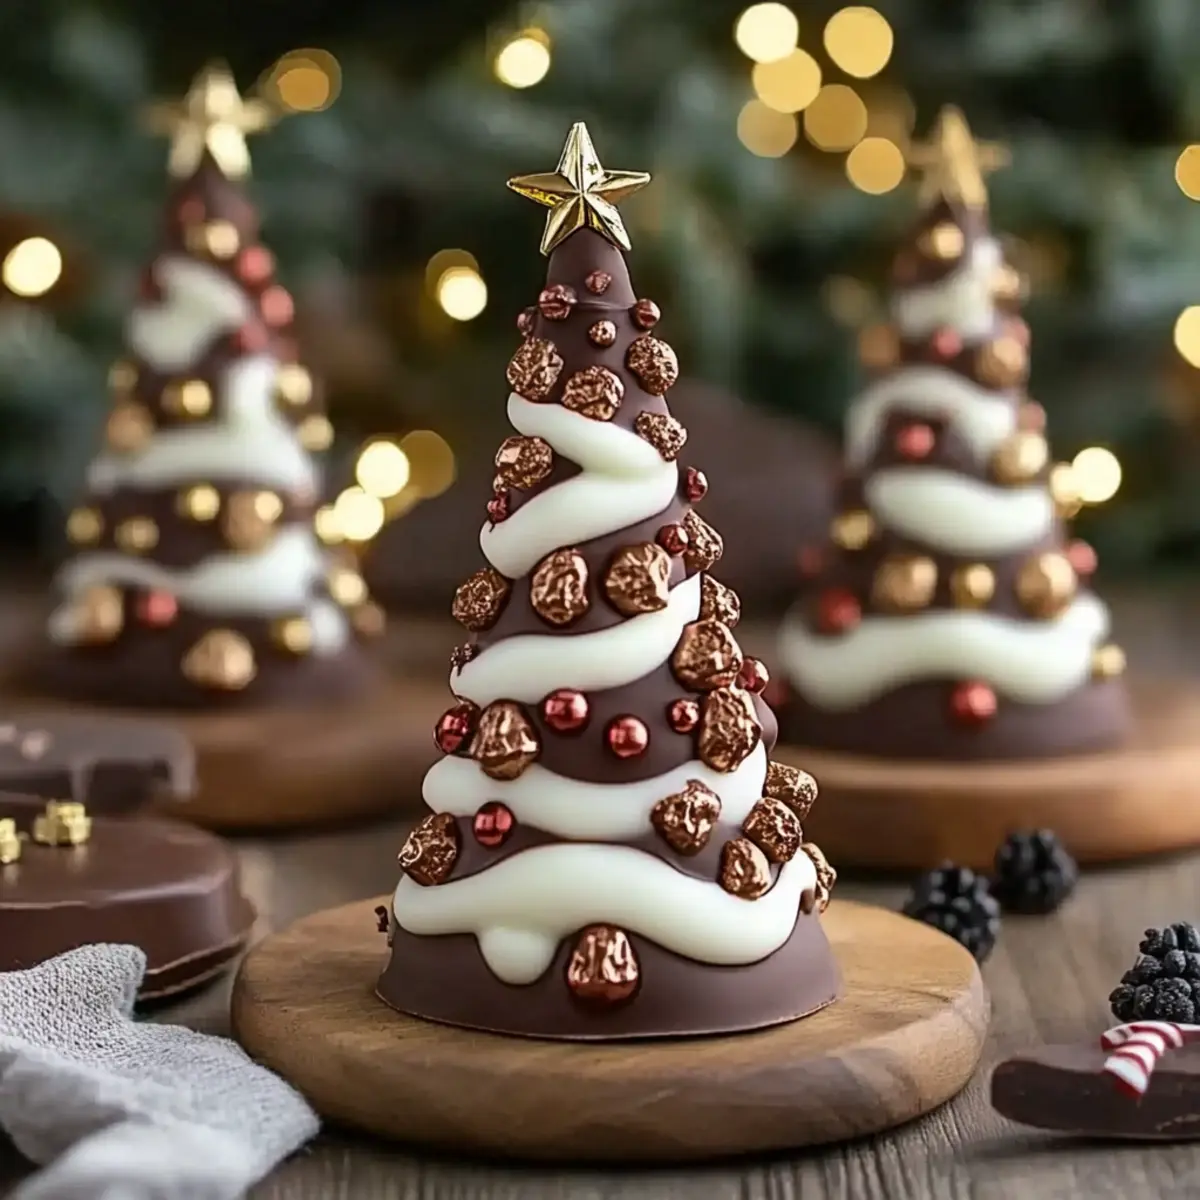
Whether you’re hosting a holiday party, looking for a fun project to do with the kids, or surprising your neighbors with homemade gifts, these charming chocolate trees are the perfect solution. Made with rich semi-sweet and creamy white chocolate, they’re as simple to create as they are spectacular to behold. Plus, with endless decorating options ranging from shimmering sprinkles to crunchy peppermint, you can customize each tree to capture the magic of the season.
Join me as we venture into this delightful recipe that’s destined to become a holiday favorite, bringing a little extra sweetness to your celebrations!
Why You'll Love This Festive & Fun Christmas Chocolate Trees
- These Festive & Fun Christmas Chocolate Trees are incredibly easy to make, allowing you to spend more time enjoying the holidays with family and friends.
- The delightful combination of semi-sweet and white chocolate creates a rich and creamy flavor that is sure to satisfy any sweet tooth.
- With endless decorating possibilities, you can personalize each tree to fit your unique holiday style, making them a versatile treat for every gathering.
- Their stunning visual appeal makes them a perfect centerpiece for holiday parties, guaranteed to impress guests of all ages.
Festive & Fun Christmas Chocolate Trees
These scrumptious treats are sure to bring joy to your holiday festivities!
For the Chocolate
• Semi-sweet chocolate chips – perfect for a rich base; melts beautifully for a shiny finish.
• White chocolate chips – adds creamy sweetness that contrasts with the dark chocolate; a delightful touch for the trees.
• Vegetable oil – a little helps to achieve a silky smooth texture while melting your chocolate.
For the Decorations
• Holiday sprinkles – sprinkle on for a festive flair, turning your trees into edible art.
• Mini candy pearls – these little gems add texture and a pop of color to your creations.
• Snowflake sprinkles – a wintery touch to make your trees sparkle like fresh-fallen snow.
• Red and green sanding sugar – perfect for a classic holiday look; use it to embody the spirit of Christmas.
• Crushed peppermint candy – for a refreshing crunch that brings minty joy to your trees.
• Gold sugar stars – because every holiday treat deserves a bit of shimmer!
For Assembly
• Pretzel sticks or pretzel rods – great for creating a sturdy trunk; they add a delicious crunch to balance the sweetness of the chocolate.
How to Make Festive & Fun Christmas Chocolate Trees
-
Prepare the Baking Sheet: Line a baking sheet with parchment paper or a silicone baking mat. For more uniform trees, lightly sketch tree shapes on the underside of the parchment as a guide.
-
Melt the Chocolate: Place semi-sweet chocolate chips in a microwave-safe bowl. Heat in 20-second intervals, stirring in between until smooth. If desired, add a touch of vegetable oil for a silky texture. Repeat this process with the white chocolate in a separate bowl.
-
Fill a Piping Bag: Spoon the melted chocolate into a piping bag or a zip-top bag. Snip a tiny opening at one corner to allow for controlled piping as you create your trees.
-
Pipe the Tree Shape: Begin by piping a straight vertical line as the trunk guide. Then, create zigzag lines back and forth along the trunk, starting narrow at the top and gradually widening toward the base to form a lovely tree shape. If using pretzel sticks, pipe the tree directly over the top portion of each pretzel to keep it secure.
-
Decorate the Trees: While the chocolate is still wet, sprinkle on your choice of holiday sprinkles, mini candy pearls, sanding sugar, snowflake sprinkles, crushed peppermint, or gold sugar stars for an inviting festive look.
-
Chill to Firm Up: Place the baking sheet in the refrigerator for 10–15 minutes, or until the chocolate trees are completely firm and ready to be enjoyed.
-
Remove and Serve: Gently lift the chocolate trees off the parchment with your fingers or a thin spatula, showcasing your delightful creations.
Optional: Drizzle some leftover melted chocolate over the trees for an extra touch of sweetness.
Exact quantities are listed in the recipe card below.
Festive & Fun Christmas Chocolate Trees Variations
Get creative with your chocolate trees and make them truly your own!
-
Nut-Free: Substitute chocolate chips with dairy-free chocolate chips to accommodate nut allergies, while still enjoying the delightful flavors.
-
Vegan: Use coconut oil in place of vegetable oil and choose vegan chocolate chips for a cruelty-free indulgence. The result will be just as creamy and delicious!
-
Spicy: Add a dash of chili powder or cayenne pepper to the melted chocolate for a surprising kick. This adds an unexpected warmth that contrasts beautifully with the sweetness.
-
Textured: Incorporate crushed nuts or seeds for added crunch and an earthy flavor that complements the chocolate perfectly. Almonds or pistachios work wonderfully for a festive look.
-
Flavor Infusion: Mix a few drops of peppermint extract into the melted chocolate. This enhances the peppermint candy decorations, giving your trees a charming, minty taste.
-
Colorful Candy: Swap out the holiday sprinkles for colorful mini M&Ms or different shaped candies for a playful approach. Your trees will become a feast for both the eyes and the taste buds!
-
Chocolate Swirl: Drizzle extra melted chocolate on top of your trees after they have set for a fun visual and flavor twist. A mix of dark and white chocolate creates a stunning marbled effect.
-
Fruit-Filled: Add a layer of dried fruit, like cranberries or strawberries, between the chocolate layers for a sweet surprise and additional tartness.
Embrace these variations to make your festive chocolate creations uniquely yours!
Make Ahead Options
These Festive & Fun Christmas Chocolate Trees are perfect for busy home cooks looking to save time during the holiday rush! You can prepare the chocolate bases by piping the tree shapes up to 24 hours in advance. After piping, allow the chocolate to chill in the refrigerator until fully set. Once firm, simply cover them with plastic wrap, ensuring no moisture gets in to maintain their texture. When you’re ready to impress, add your festive decorations just before serving, so they look vibrant and fresh. This method allows you to enjoy quick and stress-free festive cheer with your family and friends, creating delightful treats with minimal effort!
How to Store and Freeze Festive & Fun Christmas Chocolate Trees
Room Temperature: Keep your chocolate trees in a cool, dry place for up to 3 days in an airtight container to maintain their delightful crunch and freshness.
Fridge: If you want to extend their longevity, place them in the fridge for up to a week, but be sure to store in an airtight container to prevent moisture.
Freezer: For longer storage, freeze the trees in a single layer on a baking sheet, then transfer to an airtight container for up to 3 months.
Reheating: If you’re ready to enjoy your frozen chocolate treats, simply let them thaw in the fridge for a few hours before serving, ensuring they stay beautifully intact.
What to Serve with Festive & Fun Christmas Chocolate Trees?
The experience of indulging in these delightful chocolate creations can be elevated with the perfect pairings.
-
Creamy Hot Chocolate: A warm, rich drink that perfectly complements the sweet chocolate trees, enhancing the cozy holiday vibe.
-
Gingerbread Cookies: The spicy warmth of gingerbread provides a fragrant contrast, bringing extra cheer to your festive spread.
-
Eggnog: This creamy, spiced beverage adds a nostalgic touch of holiday spirit that pairs beautifully with chocolate.
-
Chocolate Dipped Fruit: Fresh fruit like strawberries or bananas dipped in chocolate creates a fruity freshness that balances the rich trees.
-
Peppermint Bark: This classic holiday treat adds a minty crunch alongside your chocolate creations, keeping the flavor playful.
-
Christmas Fruitcake: Dense with dried fruits and nuts, the traditional cake adds a hearty contrast to the lightness of the chocolate trees.
-
Spiced Cider: Warm spiced cider offers a delightful aroma and flavor that perfectly complements the sweet and creamy textures of the trees.
-
Vanilla Ice Cream: A scoop of cold, creamy vanilla ice cream balances the richness of the chocolate trees, bringing dreamy bliss to your dessert table.
-
Sugary Nut Mix: A sprinkle of sweet and salty nuts provides the perfect crunch, adding different textures to your holiday dessert experience.
Chef's Helpful Tips
- To achieve the best results with your Festive & Fun Christmas Chocolate Trees, make sure to use high-quality chocolate chips for a rich flavor and smooth melting.
- When melting chocolate, be patient and heat in short increments, stirring in between to avoid burning.
- For a shinier finish, remember to add a little vegetable oil to the melted chocolate; this can make a significant difference in texture.
- Once you pipe the tree shape, be sure to work quickly to add your decorations while the chocolate is still wet, ensuring they stick beautifully.
- Finally, chilling the trees for the full 15 minutes is essential for a perfect, firm structure that won’t topple over.
Festive & Fun Christmas Chocolate Trees Recipe FAQs
How do I know if my chocolate chips are fresh enough to use?
Absolutely! To ensure your chocolate chips are fresh, look for any signs of discoloration or an unusual odor. Fresh chocolate should have a pleasant, rich aroma. If the chips show dark spots all over or have a white film (bloom), it’s best to replace them for optimal flavor and quality in your Festive & Fun Christmas Chocolate Trees.
What’s the best way to store leftover chocolate trees?
Very simple! Store your chocolate trees in an airtight container at room temperature for up to 3 days. If you live in a warm climate, it’s best to keep them in the refrigerator for up to a week, ensuring they remain fresh and maintain their crunch.
Can I freeze my chocolate trees if I make too many?
Absolutely! For longer storage, place your chocolate trees on a baking sheet in a single layer and freeze for about 1 hour. Then, transfer them to an airtight container or freezer bag for up to 3 months. To enjoy, just let them thaw in the fridge for a few hours before serving—this keeps their delightful texture intact!
What should I do if my chocolate isn’t melting smoothly?
If your chocolate isn’t melting to a smooth consistency, try reheating it in shorter intervals, about 10 to 15 seconds, stirring well in between. If it seems too thick, add a tiny bit more vegetable oil; just be cautious not to overdo it, as too much oil can prevent the chocolate from hardening properly.
Are there any dietary considerations for pets or allergies with these trees?
For sure! It’s essential to be mindful that chocolate is toxic to pets, particularly dogs. Ensure these festive treats are placed out of reach. If you or your guests have allergies, consider using dairy-free chocolate chips or sprinkles, and always double-check the ingredient labels to ensure they meet your dietary needs.
What if I want to make a healthier version of these chocolate trees?
A fantastic idea! You can substitute semi-sweet chocolate chips with dark chocolate chips that have a higher cocoa content for a slightly healthier option. Additionally, consider using natural sweeteners like honey or maple syrup. For decoration, opt for dried fruit or unsweetened coconut flakes instead of sugary sprinkles—your Festive & Fun Christmas Chocolate Trees will still look fabulous and festive!
Equipment
- Microwave-safe bowl
- piping bag
- Baking Sheet
- Parchment paper
Ingredients
For the Chocolate Base
- 1 cup Semi-sweet chocolate chips
- 1 cup White chocolate chips
- 2 tablespoons Vegetable oil for texture
For Decoration
- 1 cup Holiday sprinkles
- 1 cup Mini candy pearls
- 1 cup Snowflake sprinkles
- 1 cup Red and green sanding sugar
- 1 cup Crushed peppermint candy
- 1 cup Gold sugar stars
For the Structure
- 12 sticks Pretzel sticks or pretzel rods
Instructions
How to Make Festive & Fun Christmas Chocolate Trees
- Line a baking sheet with parchment paper or a silicone mat. For a fun twist, lightly sketch tree shapes on the underside as a guide for your chocolate masterpiece.
- Place semi-sweet chocolate chips in a microwave-safe bowl. Heat in 20-second intervals, stirring between until melted and smooth. Add vegetable oil for a silkier texture. Repeat this step with white chocolate chips in a separate bowl.
- Spoon the melted chocolate into a piping bag or zip-top bag. Snip a tiny opening at one corner to control piping for creating tree shapes.
- Start by piping a straight vertical line as the trunk. Next, create zigzag lines back and forth, beginning narrow at the top and widening toward the base to form a tree. If using pretzel sticks, pipe directly over them for added support.
- While the chocolate is still wet, sprinkle holiday sprinkles, candy pearls, sanding sugar, snowflake sprinkles, crushed peppermint, or gold sugar stars generously.
- Place the baking sheet in the refrigerator for 10–15 minutes, or until the chocolate trees are completely firm.
- Gently lift your chocolate trees off the parchment using your fingers or a thin spatula. Marvel at your delicious creations!