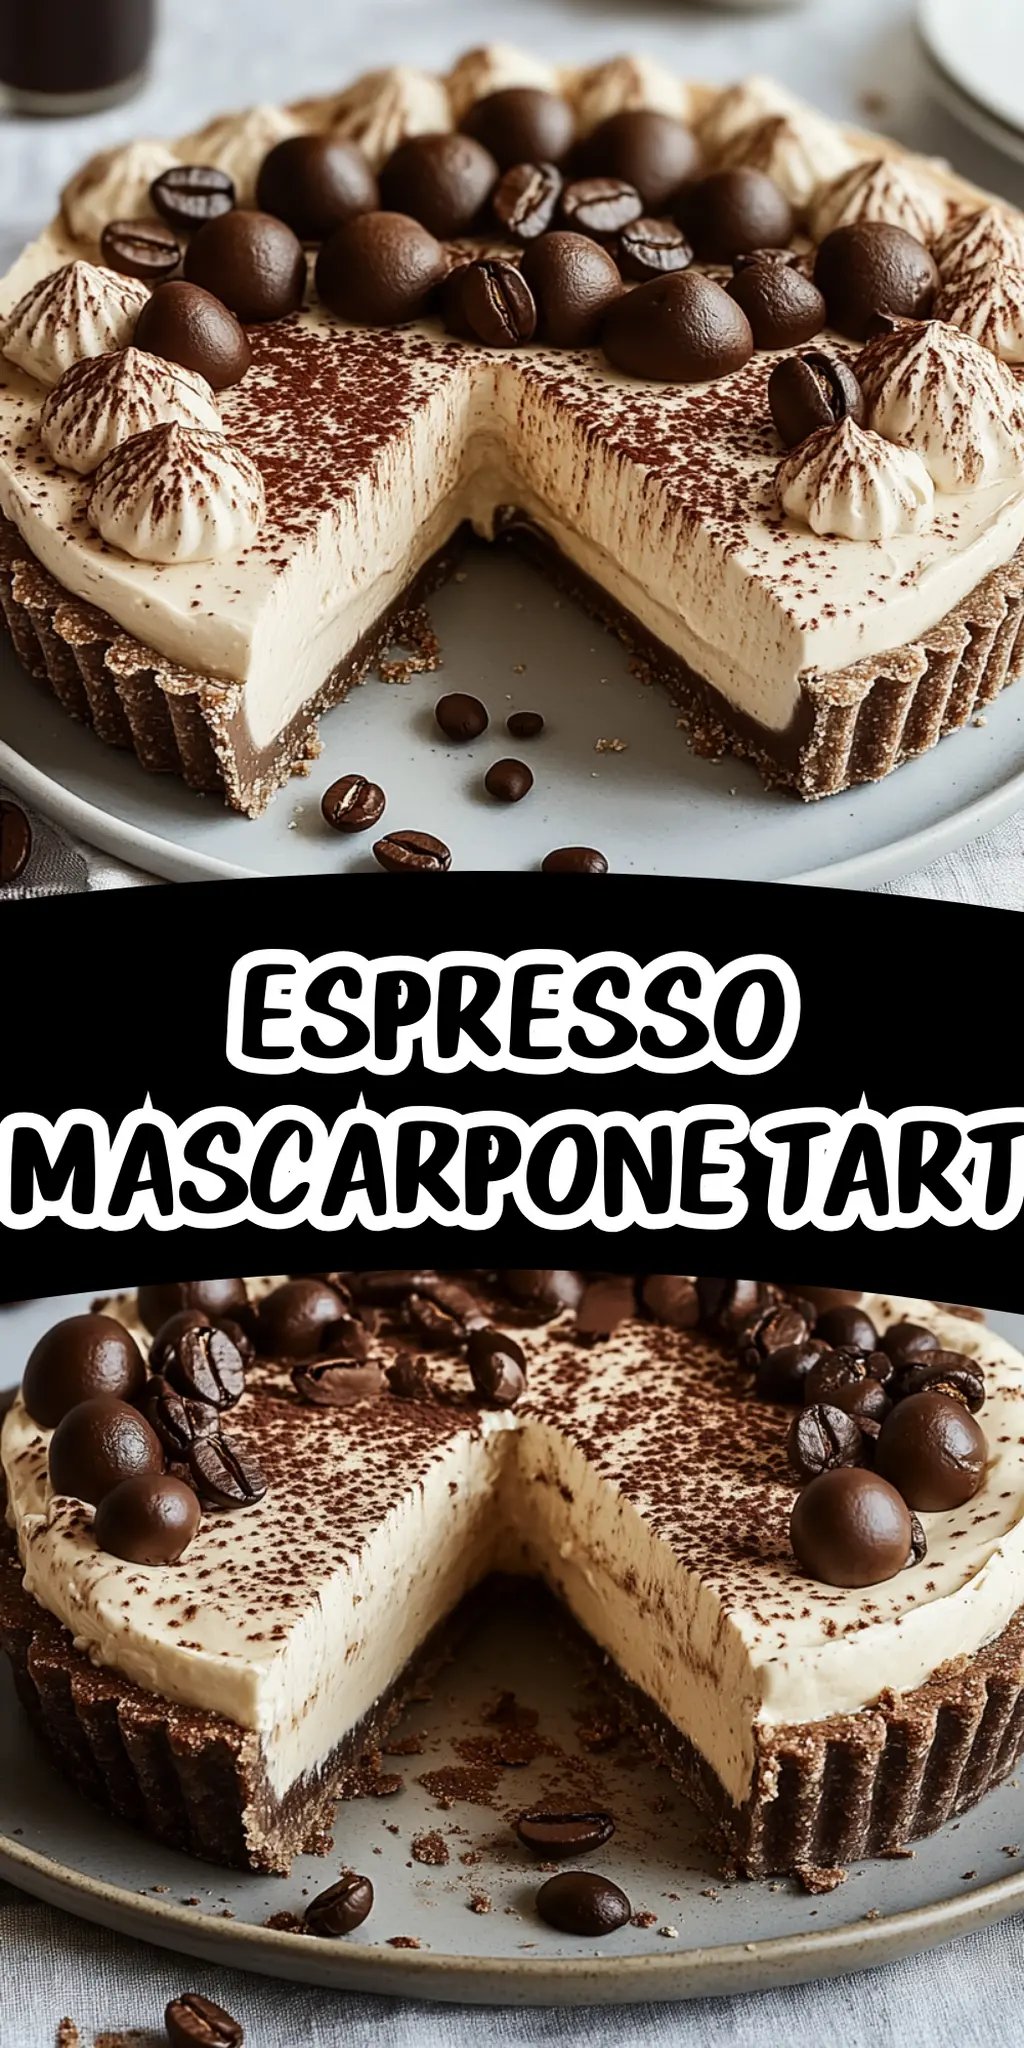
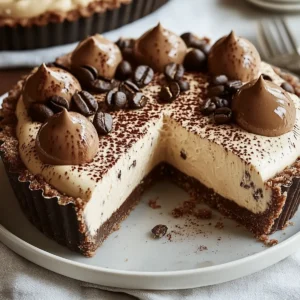
There’s a special kind of joy that comes from creating something delicious in the kitchen, especially when it can turn an ordinary day into a remarkable experience. Let me take you on a journey to flavor town with my Espresso Mascarpone Tart, a delightful dessert that harmoniously blends rich cocoa, smooth mascarpone, and a hint of coffee. Imagine slicing into a beautifully chilled tart, its velvety filling whispering promises of indulgence with every forkful.

This isn’t just any dessert; it’s the perfect showstopper for a dinner party or a comforting treat after a long day. You’d be surprised by how simple it is to bring this elegant creation to life! Even if you’re just beginning your culinary adventures, this tart is an absolute winner, allowing you to impress without the stress. So grab your mixing bowl and join me in crafting a dessert that beautifully marries classic flavors with a modern twist!
Why You'll Love This Espresso Mascarpone Tart
- This Espresso Mascarpone Tart is incredibly easy to make, allowing you to whip up a show-stopping dessert with minimal effort.
- The rich blend of cocoa and mascarpone creates a flavor profile that’s both indulgent and rejuvenating, perfect for any coffee lover.
- Its visual appeal, with the elegant dusting of cocoa and optional toppings, makes it a stunning centerpiece for any gathering.
- Plus, this tart can be prepared ahead of time, making it a fantastic time-saver for busy nights or special occasions.
Espresso Mascarpone Tart Ingredients
For the Tart Crust
• All-purpose flour – A key ingredient that forms the base for a perfectly flaky tart shell.
• Unsweetened cocoa powder – Adds a rich chocolate flavor that complements the mascarpone filling beautifully.
• Powdered sugar – Offers a touch of sweetness, making the tart crust delicate and delightful.
• Salt – Balances the sweetness and enhances the overall flavor profile.
• Unsalted butter (chilled and cubed) – Keeps the crust tender and flaky; ensure it’s chilled for the best texture.
• Large egg yolk – Acts as a binder to help the crust hold together.
• Cold water – Use just enough to bring the dough together, keeping it cold for a flaky result.
For the Mascarpone Filling
• Mascarpone cheese – The star ingredient that gives the tart its luscious creaminess; use full-fat for the best flavor.
• Heavy cream – Whipped to soft peaks, it lightens the filling and adds volume.
• Powdered sugar – Sweetens the cream without adding graininess, ensuring a smooth filling.
• Espresso – Provides a rich, bold flavor that defines the ‘Espresso Mascarpone Tart’; make sure it’s cooled before adding.
• Vanilla extract – A splash enhances the flavors and adds depth to the filling.
• Coffee liqueur (optional) – Adds an extra layer of coffee flavor; use for a more sophisticated touch.
For Decoration
• Cocoa powder – For dusting the top, creating a stunning visual and adding a hint of chocolate flavor.
• Chocolate shavings (optional) – A lovely garnish that elevates the tart’s appearance and taste.
• Coffee beans (for decoration, optional) – Adds an elegant touch to impress your guests with a hint of decorum.
How to Make Espresso Mascarpone Tart
-
Preheat your oven to 350°F (175°C) to ensure it’s hot and ready for the tart crust. This temperature is key to achieve a perfectly baked and set foundation for your delicious filling.
-
Combine the all-purpose flour, cocoa powder, powdered sugar, and salt in a mixing bowl. Stir gently until well-blended, allowing the rich aromas of chocolate to fill the air.
-
Add the chilled, cubed butter to your dry mixture. Use your fingertips to mix until it resembles coarse crumbs, ensuring the butter remains cold for that flaky texture.
-
Incorporate the egg yolk and gradually mix in the cold water, one tablespoon at a time. The goal is a dough that holds together without being sticky—just until it forms a ball.
-
Press the dough into a tart pan, covering the bottom and sides evenly. Prick the bottom with a fork—this helps to prevent bubbling during baking, so don’t skip this step!
-
Bake in the preheated oven for 15-20 minutes or until the tart crust is set. Once baked, remove from the oven and let it cool completely on a wire rack.
-
Whip the heavy cream in a mixing bowl until soft peaks form. This step introduces a delightful lightness to the filling that balances the tart’s richness.
-
Mix the mascarpone cheese, powdered sugar, cooled espresso, vanilla extract, and coffee liqueur (if using) in another bowl. Blend until smooth and creamy, capturing that luscious flavor.
-
Fold the whipped cream into the mascarpone mixture gently. Aim for a consistent mixture without deflating the whipped cream; it should be airy yet cohesive.
-
Pour the espresso mascarpone filling into the cooled tart crust. Smooth the top with a spatula, admiring how the filling melds with the chocolate crust.
-
Refrigerate the tart for at least 2 hours to allow it to set. This is the perfect time to clean up and savor the anticipation of your delicious creation!
-
Dust the top with cocoa powder before serving for a beautiful finish. Add chocolate shavings and coffee beans for decorative flair, if desired.
-
Slice and serve your Espresso Mascarpone Tart chilled, and revel in the joy it brings to your taste buds and any guests around.
Optional: Garnish with fresh mint leaves for a pop of color and freshness.
Exact quantities are listed in the recipe card below.
What to Serve with Espresso Mascarpone Tart?
Bringing your dessert to life is all about finding those perfect pairings that delight the senses.
-
Rich Coffee: The perfect companion that enhances the tart’s espresso flavors, creating a harmonious and indulgent experience.
-
Fresh Berries: Sweet and tangy, fresh berries like raspberries or strawberries offer a vibrant contrast to the tart’s creamy richness. A burst of freshness with each bite adds a refreshing twist!
-
Vanilla Ice Cream: A scoop of velvety vanilla ice cream provides a delightful temperature contrast and creaminess, complementing the tart’s flavors perfectly.
-
Chocolate Mousse: For the ultimate chocolate lover’s dream, a light chocolate mousse can add an airy richness to your dessert plate, making it luxurious.
-
Mint Tea: A warm cup of mint tea offers a soothing palate cleanser, allowing the coffee notes to linger without overwhelming the taste buds.
-
Liqueur Pairing: Serving a coffee liqueur alongside the tart can elevate the flavor experience, particularly for adults enjoying a cozy evening.
-
Cheese Platter: A selection of mild cheeses can provide a savory contrast, balancing the sweetness of the tart while inviting new flavor explorations.
-
Chocolate-Covered Espresso Beans: For an extra touch of elegance and crunch, these treats keep the coffee theme alive, offering a bite-sized explosion of flavor.
-
Chocolate Ganache Tart: For a double chocolate extravaganza, serve alongside small slices of chocolate ganache tart to create a rich, decadent dessert experience.
Make Ahead Options
These Espresso Mascarpone Tart preparations are perfect for busy home cooks looking to save time without sacrificing quality! You can prepare the tart crust up to 3 days in advance; just ensure you wrap it tightly in plastic wrap and store it in the refrigerator to maintain its freshness. Additionally, the mascarpone filling can be whipped and combined up to 24 hours ahead; simply refrigerate it in an airtight container. When you’re ready to serve, pour the chilled filling into the pre-baked crust, refrigerate for at least 2 hours to set, and dust it with cocoa powder and optional decorations before serving. This way, you’ll have a stunning dessert ready with minimal effort!
Espresso Mascarpone Tart Variations
Feel free to put your own twist on this delightful dessert and make it truly yours!
-
Dairy-Free: Substitute mascarpone cheese with coconut cream and use plant-based butter for a creamy, indulgent alternative.
-
Gluten-Free: Swap all-purpose flour for a gluten-free blend to accommodate dietary needs without sacrificing flavor.
-
Less Sweet: Reduce the amount of powdered sugar in both the crust and filling to let the earthy flavors of espresso shine through.
-
Nutty Crust: Incorporate crushed almonds or walnuts into the crust for added texture and a nutty flavor that complements the chocolate.
-
Flavor Infusion: Experiment by adding flavored extracts such as hazelnut or almond instead of vanilla for a delightful surprise in every bite.
-
Vegan Option: Use a vegan cream cheese alternative, plant-based heavy cream, and aquafaba whipped to recreate that luscious mascarpone texture.
-
Spicy Touch: For those who enjoy a kick, sprinkle in some cayenne or chili powder into the filling for a surprising warmth.
-
Frozen Treat: Transform this tart into a frozen dessert; just simply blend the filling and freeze it to serve as a refreshing treat on hot days.
Tailoring the flavors to suit your preferences is half the fun—let your creativity shine!
How to Store and Freeze Espresso Mascarpone Tart
Fridge: Store your Espresso Mascarpone Tart wrapped in plastic wrap or in an airtight container in the refrigerator for up to 3 days. This helps maintain its creamy texture and rich flavors.
Freezer: You can freeze the tart for up to 1 month. First, cut it into slices, then wrap each piece tightly in plastic wrap followed by aluminum foil to prevent freezer burn.
Thawing: To enjoy, transfer the frozen tart to the fridge a few hours before serving to let it thaw gradually. Avoid using a microwave, as this can alter the texture of the filling.
Serving: Serve the tart straight from the fridge for the best taste experience. Dust with cocoa powder before serving for that perfect finishing touch!
Chef's Helpful Tips
- When making the Espresso Mascarpone Tart, ensure your butter is properly chilled to achieve a flaky crust, as warm butter can lead to a dense texture.
- Be careful not to overwork the dough when mixing in the water; adding just enough to hold the mixture together is key for a tender crust.
- When folding the whipped cream into the mascarpone mixture, use a gentle motion to maintain the airy texture that gives the filling its delightful lightness.
- Allow the tart to chill in the refrigerator for a minimum of 2 hours to set properly, ensuring the flavors meld beautifully before serving.
Espresso Mascarpone Tart Recipe FAQs
How do I select the right mascarpone cheese?
When choosing mascarpone cheese, look for a product that’s labeled as “pure” or “100%” without any stabilizers or additives. The texture should be creamy and smooth, with a slightly sweet and rich flavor. I often prefer brands that come in a tub rather than a squeeze tube, as they tend to have a fresher taste.
How should I store my Espresso Mascarpone Tart?
Absolutely! Store your Espresso Mascarpone Tart tightly wrapped in plastic wrap or in an airtight container in the refrigerator. This way, it will remain fresh for up to 3 days. Keeping it refrigerated not only preserves its velvety texture but also helps the flavors continue to develop, making each bite even more delightful.
Can I freeze the Espresso Mascarpone Tart?
Very! To freeze the tart, I recommend slicing it into individual portions first. Wrap each slice tightly in plastic wrap and then cover it with aluminum foil. This method prevents freezer burn and helps retain its delicious flavor. You can freeze it for up to 1 month, which is perfect for those unexpected dessert cravings!
What should I do if my filling is too runny?
If your mascarpone filling turns out runny, it may not have been folded into the whipped cream carefully. To fix it, you can blend in a small amount of gelatin. Simply dissolve 1 teaspoon of unflavored gelatin in 2 tablespoons of warm water, and then mix it into the filling until combined. Chill it for an extra hour to firm it up before serving—this should do the trick!
Is it okay for guests with lactose intolerance to eat this tart?
It’s important to consider dietary restrictions. This Espresso Mascarpone Tart contains dairy products, which may not be suitable for those with lactose intolerance or milk allergies. However, you can create a dairy-free version by substituting the mascarpone with a similar plant-based cream cheese alternative and using coconut cream instead of heavy cream. These adjustments can help ensure everyone can enjoy this delicious treat!
Equipment
- Mixing bowl
- tart pan
- Whisk
- spatula
Ingredients
For the Tart Crust
- 1 cup All-purpose flour
- 1/4 cup Unsweetened cocoa powder
- 2 tablespoons Powdered sugar
- 1/4 teaspoon Salt
- 1/2 cup Unsalted butter (chilled and cubed)
- 1 large Egg yolk
- 2-4 tablespoons Cold water Use as needed
For the Mascarpone Filling
- 1 cup Mascarpone cheese Use full-fat for best flavor
- 1 cup Heavy cream Whipped to soft peaks
- 1/4 cup Powdered sugar
- 1/2 cup Espresso Cooled
- 1 teaspoon Vanilla extract
- 2 tablespoons Coffee liqueur (optional)
For Decoration
- 2 tablespoons Cocoa powder For dusting
- 1/4 cup Chocolate shavings (optional)
- pieces Coffee beans (for decoration, optional)
Instructions
How to Make Espresso Mascarpone Tart
- Preheat your oven to 350°F (175°C).
- Combine the all-purpose flour, cocoa powder, powdered sugar, and salt in a mixing bowl.
- Add the chilled, cubed butter to your dry mixture and mix until it resembles coarse crumbs.
- Incorporate the egg yolk and gradually mix in the cold water, until a dough forms.
- Press the dough into a tart pan, covering the bottom and sides evenly. Prick the bottom with a fork.
- Bake in preheated oven for 15-20 minutes or until set. Cool on a wire rack.
- Whip the heavy cream in a mixing bowl until soft peaks form.
- Mix the mascarpone cheese, powdered sugar, cooled espresso, vanilla extract, and coffee liqueur until smooth.
- Fold the whipped cream into the mascarpone mixture gently.
- Pour the espresso mascarpone filling into the cooled tart crust and smooth the top.
- Refrigerate the tart for at least 2 hours to set.
- Dust the top with cocoa powder before serving. Add chocolate shavings and coffee beans for decoration if desired.
- Slice and serve chilled.