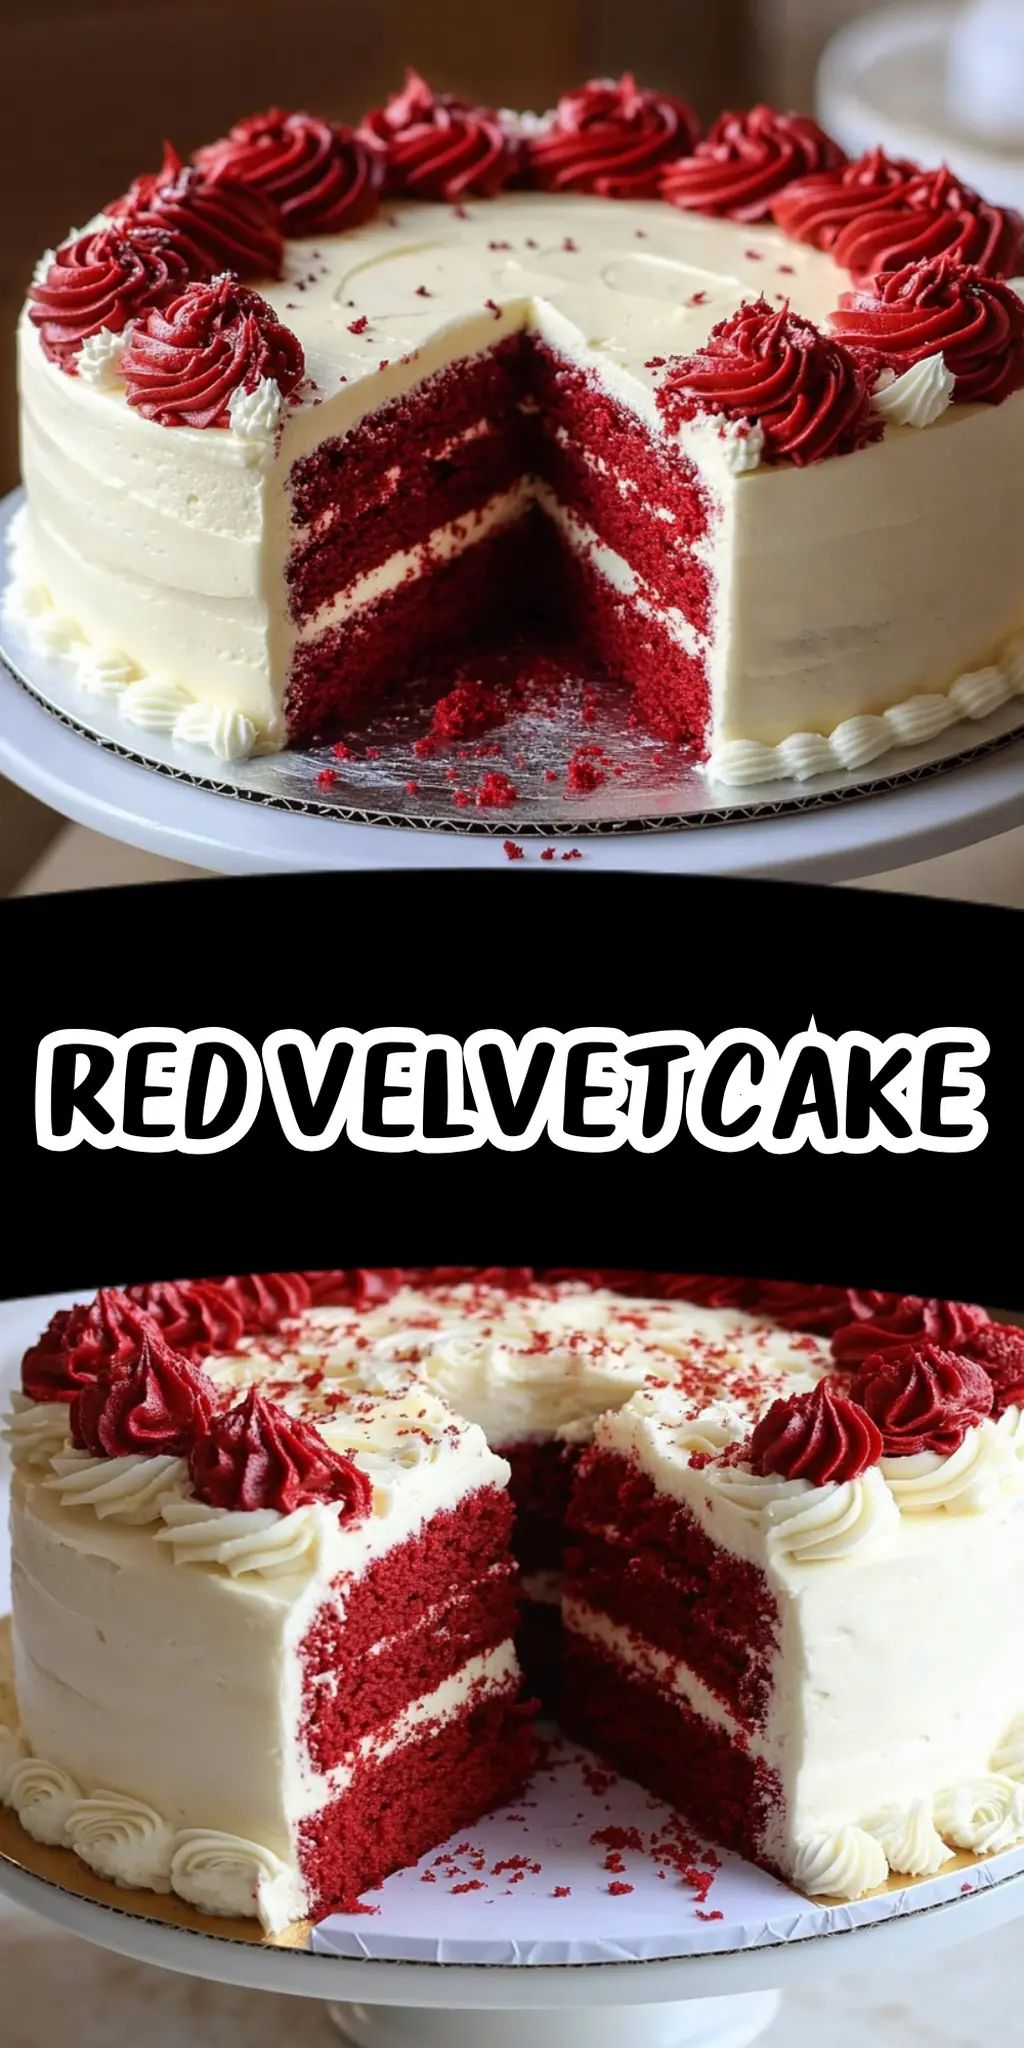
When it comes to celebratory desserts, few can rival the stunning beauty and delightfully indulgent taste of a Red Velvet Cake. I first encountered this showstopper at a friend’s birthday party, and the moment I took a bite, I was hooked. The rich, velvety texture complemented by the tangy cream cheese frosting felt like a warm embrace, instantly brightening my day.
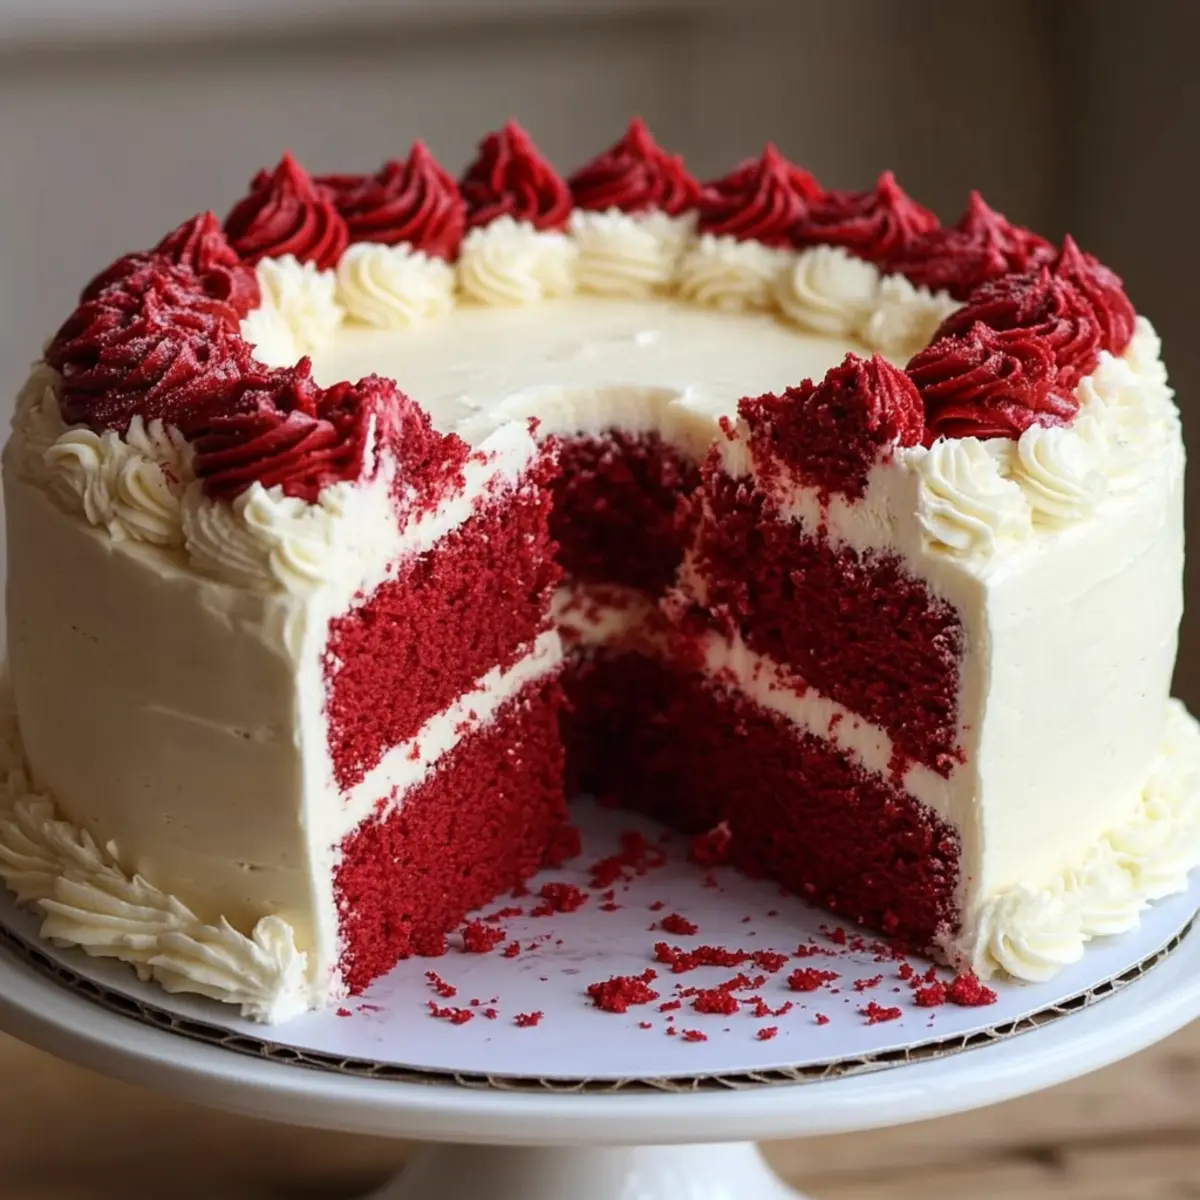
Perfect for special occasions or when you’re simply craving something indulgent, this recipe brings together the perfect balance of buttery sweetness and a hint of cocoa, all dressed in that signature ruby red hue. Imagine it cooling in your kitchen while you prepare for friends or family to arrive, and the delightful aroma filling the air, drawing everyone closer to the heart of your home.
What I love most about this cake is its versatility; it can be dressed up for a fancy dinner party or enjoyed casually over coffee with a friend. Leave the fast food behind and treat yourself to a slice of homemade happiness! Join me as we create a Red Velvet Cake that’s as astonishingly beautiful as it is delicious.
Why You'll Love This Red Velvet Cake
- This Red Velvet Cake is incredibly easy to make, making it perfect for bakers of all skill levels.
- You will be amazed by the luscious flavor that balances sweetness with a hint of cocoa, creating a dessert that everyone will adore.
- Its striking red color and creamy frosting make for a visually stunning centerpiece at any gathering, sure to impress your guests.
- Plus, this cake is versatile enough to serve at both formal occasions and casual get-togethers, making it a total crowd-pleaser.
Red Velvet Cake Ingredients
• Get ready to whip up this delectable treat!
For the Cake
- All-purpose flour – provides the structure needed for this luscious Red Velvet Cake.
- Granulated sugar – adds the sweetness that complements the cake’s rich flavors.
- Baking soda – helps the cake rise, creating a light and fluffy texture.
- Salt – enhances the overall flavor, balancing the sweetness.
- Cocoa powder – gives a subtle chocolate flavor that beautifully enhances the cake’s taste.
- Vegetable oil – results in a moist cake with a tender crumb.
- Buttermilk – contributes to the cake’s tenderness and tangy flavor profile.
- Large eggs – bind the ingredients together, ensuring a stable structure.
- Red food coloring – gives that signature vibrant hue, making the cake truly eye-catching.
- Vanilla extract – infuses a warm, sweet aroma and flavor.
- White vinegar – reacts with baking soda to enhance the cake’s leavening.
For the Frosting
- Cream cheese – creates a rich, tangy frosting that pairs perfectly with the cake.
- Unsalted butter – adds creaminess and a smooth texture to the frosting.
- Powdered sugar – sweetens the frosting while giving it that desirable fluffy consistency.
- Vanilla extract – boosts the flavor of the frosting, making it even more delectable.
- Milk – use if needed to achieve your desired frosting consistency.
How to Make Red Velvet Cake
- Preheat your oven to 350°F (175°C) and prep your pans by greasing and flouring two 9-inch round cake pans, ensuring a smooth release later.
- Sift together the flour, sugar, baking soda, salt, and cocoa powder in a large mixing bowl, combining them well to create a light and fluffy dry mixture.
- Whisk together the vegetable oil, buttermilk, eggs, red food coloring, vanilla extract, and vinegar in another bowl until it’s all blended and you see a bright, cheerful red.
- Combine the wet ingredients with the dry ingredients by gradually adding them together. Mix until just combined; avoid overmixing to keep that cake tender.
- Pour the batter evenly into the prepared cake pans, filling them about halfway to allow space for rising during baking.
- Bake in the preheated oven for 30–35 minutes, or until a toothpick inserted into the center comes out clean, and the cakes look beautifully domed.
- Cool the cakes in the pans for about 10 minutes, then carefully transfer them to a wire rack to cool completely, allowing them to set perfectly.
- Beat the softened cream cheese and butter together in a mixing bowl until it’s smooth and creamy, creating a rich base for your frosting.
- Add the powdered sugar gradually, mixing until well combined and fluffy. Stir in the vanilla extract for that delightful flavor infusion.
- Adjust the frosting consistency if necessary; add milk one tablespoon at a time until you reach your desired smoothness.
- Level the cooled cake layers with a knife if needed, ensuring they stack evenly for a stunning presentation.
- Layer one cake on a serving plate, spreading a generous layer of cream cheese frosting on top. Stack the second layer and frost the top and sides for a beautiful finish.
- Decorate your cake optionally with additional frosting, sprinkles, or fresh berries to add a personal touch and extra charm.
- Slice the cake and serve at room temperature, ready to delight family and friends with every bite!
Optional: Serve with a dollop of whipped cream on top for a touch of extra indulgence.
Exact quantities are listed in the recipe card below.
Make Ahead Options
These Red Velvet Cake preparations are perfect for busy home cooks looking to save time without sacrificing quality. You can bake the cake layers up to 3 days in advance; simply let them cool completely, wrap them tightly in plastic wrap, and refrigerate to keep them fresh and moist. The cream cheese frosting can also be made ahead, stored in an airtight container in the fridge for up to 5 days. When you’re ready to serve, take the cake out of the fridge, frost, and allow it to come to room temperature before slicing. This approach ensures you’ll have a deliciously impactful dessert ready to impress with minimal last-minute work!
What to Serve with Red Velvet Cake?
Indulging in a slice of this exquisite cake deserves a well-thought-out meal to complement its rich flavors and delightful texture.
- Creamy Mashed Potatoes: Their buttery richness pairs beautifully with any meal while allowing the cake’s flavors to shine as dessert.
- Roasted Vegetables: A colorful mix of seasonal veggies adds a satisfying sweetness that balances the cake’s decadence without overpowering it.
- Grilled Chicken Skewers: Savory, slightly smoky flavors in these skewers provide a delightful contrast to the cake’s sweetness, creating an inviting dining experience.
A perfect pairing can elevate the entire meal. For a refreshing touch, consider a zesty citrus salad. The brightness of lemon and orange can cleanse the palate and lift the flavors of the cake. If you’re in the mood for something more casual, opt for a decadent hot chocolate. The warm, chocolatey drink invites cozy vibes that match the luxurious feel of the Red Velvet Cake.
- Fruity Cheesecake Bars: For those who love a layered experience, these bars add a fruity, tangy twist that complements the cake’s creamy frosting beautifully.
How to Store and Freeze Red Velvet Cake
Room Temperature: Store leftover Red Velvet Cake at room temperature for up to 3 days, loosely covered with plastic wrap or a cake dome to keep it fresh.
Fridge: If your cake has cream cheese frosting, refrigerate it for up to 5 days. Make sure to cover it tightly to prevent it from drying out.
Freezer: To freeze, wrap individual slices or the whole cake in plastic wrap, then aluminum foil. It can be stored in the freezer for up to 3 months without losing flavor.
Reheating: Thaw frozen cake in the refrigerator overnight before serving. You can enjoy it at room temperature or warm it slightly in the microwave for about 10-15 seconds.
Red Velvet Cake Variations
Feel free to explore these delightful twists that make your Red Velvet Cake uniquely yours!
- Gluten-Free: Substitute all-purpose flour with a gluten-free flour blend for a delicious, gluten-free option that everyone can enjoy.
- Chocolate Lovers: Add 1/2 cup of dark chocolate chips to the batter for an added layer of richness and decadence.
- Spice It Up: Mix in a teaspoon of cinnamon or nutmeg for a warm spice that complements the sweetness beautifully.
- Healthier Swap: Replace half the vegetable oil with unsweetened applesauce for a lower-fat, moist cake.
- Berry Burst: Fold in 1 cup of fresh raspberries or chopped strawberries into the batter before baking for a fruity explosion.
For those who crave a bit more tang, adding fresh fruit can elevate the flavor profile. Raspberries’ tartness pairs wonderfully with the sweet cream cheese frosting, creating a symphony of flavors.
- Cream Cheese Alternatives: Use mascarpone or vegan cream cheese for a dairy-free frosting option that still delivers creaminess.
- Citrus Zest: Incorporate the zest of one lemon or orange into the batter or frosting for a zesty, refreshing twist that brightens the flavors.
- Layered Delight: Bake as a sheet cake or cupcakes for a fun variation that’s perfect for sharing at casual gatherings!
Experimenting with these variations will not only enhance your Red Velvet Cake but also make baking it an even more enjoyable adventure!
Chef's Helpful Tips
- When making the Red Velvet Cake, be sure to sift the dry ingredients thoroughly to achieve a light and airy batter.
- Avoid overmixing when combining wet and dry ingredients, as this can lead to a dense cake texture.
- To enhance the cake’s vibrant color, use high-quality red food coloring and make sure your buttermilk is at room temperature for better mixing.
- Bake the cakes until a toothpick comes out clean, but don’t forget to check them at the lower end of the baking time for optimal moisture.
Red Velvet Cake Recipe FAQs
What should I look for in ripe ingredients when making a Red Velvet Cake?
Absolutely! For the best results, use room temperature buttermilk and eggs; this helps to create a smoother batter. When selecting your red food coloring, opt for a high-quality, liquid food coloring as it lends a vibrant color to your cake. Be sure your cocoa powder is fresh—look for a rich, dark color without any clumps or signs of moisture.
How should I store leftover Red Velvet Cake, and how long will it last?
Very! If you have any leftovers, you can keep your Red Velvet Cake at room temperature for up to 3 days, covered loosely with plastic wrap or a cake dome to maintain its freshness. However, if your cake is frosted with cream cheese frosting, it’s best to refrigerate it to avoid spoilage, allowing it to stay delicious for up to 5 days.
Can I freeze my Red Velvet Cake, and if so, how do I do it?
Absolutely! Freezing your Red Velvet Cake is a great way to enjoy it later. Here’s how: First, let the cake cool completely. Then, wrap individual slices or the entire cake tightly in plastic wrap, followed by a layer of aluminum foil for added protection. This will prevent freezer burn and keep it fresh for up to 3 months. When you’re ready to enjoy, simply thaw it in the refrigerator overnight before serving.
What if my Red Velvet Cake is coming out too dense or dry?
Don’t worry! A dense texture can be caused by overmixing when combining wet and dry ingredients—aim for just combined. If your cake ends up too dry, make sure to check your oven temperature; it may be baking at too high a heat. Measure your ingredients accurately, as too much flour can also lead to a drier texture. If you find yourself with a dry cake, a drizzle of simple syrup before frosting can help add moisture back in.
Are there any dietary considerations for this Red Velvet Cake?
Of course! If you’re baking for someone with dietary restrictions, I recommend substituting the all-purpose flour with a gluten-free blend to keep it similar in texture. For those avoiding dairy, you can use a dairy-free butter and substitute the buttermilk with an almond milk and vinegar mixture (1 cup almond milk + 1 tablespoon vinegar, let sit for 5 minutes). Just make sure to check your frosting as well, using cream cheese alternatives or vegan frosting for a fully dairy-free cake!
Can I make this recipe as cupcakes instead?
Absolutely! If you’re in the mood for individual servings, you can pour the Red Velvet Cake batter into a lined cupcake pan. Bake at 350°F (175°C) for about 18-20 minutes, or until a toothpick inserted comes out clean. They’ll be just as delicious and delightful, perfect for parties or sharing!
Equipment
- Oven
- Mixing bowls
- Whisk
- Measuring cups
- 9-inch round cake pans
- Cooling Rack
Ingredients
For the Cake
- 2 cups All-purpose flour provides structure
- 1.5 cups Granulated sugar adds sweetness
- 1 teaspoon Baking soda helps the cake rise
- 1 teaspoon Salt enhances flavor
- 1 tablespoon Cocoa powder adds subtle chocolate flavor
- 1 cup Vegetable oil results in a moist cake
- 1 cup Buttermilk contributes to tenderness
- 2 large Eggs binds the ingredients
- 1 tablespoon Red food coloring gives vibrant hue
- 1 teaspoon Vanilla extract infuses aroma
- 1 teaspoon White vinegar enhances leavening
For the Frosting
- 8 oz Cream cheese creates rich frosting
- 1/2 cup Unsalted butter adds creaminess
- 4 cups Powdered sugar sweetens frosting
- 1 teaspoon Vanilla extract boosts frosting flavor
- 3 tablespoons Milk for desired consistency
Instructions
Cake Preparation
- Preheat your oven to 350°F (175°C) and prep your pans by greasing and flouring two 9-inch round cake pans.
- Sift together the flour, sugar, baking soda, salt, and cocoa powder in a large mixing bowl.
- Whisk together the vegetable oil, buttermilk, eggs, red food coloring, vanilla extract, and vinegar in another bowl.
- Combine the wet ingredients with the dry ingredients by gradually adding them together. Mix until just combined.
- Pour the batter evenly into the prepared cake pans.
- Bake in the preheated oven for 30–35 minutes, or until a toothpick inserted comes out clean.
- Cool the cakes in the pans for about 10 minutes, then transfer them to a wire rack to cool completely.
Frosting Preparation
- Beat the softened cream cheese and butter together until it’s smooth and creamy.
- Add the powdered sugar gradually, mixing until well combined and fluffy.
- Stir in the vanilla extract and adjust the frosting consistency with milk if necessary.
- Level the cooled cake layers if needed, then layer one cake on a serving plate and spread frosting on top.
- Stack the second layer and frost the top and sides.
- Decorate optionally and slice to serve.